
What Bunraku can do for you
Bunraku unites two leading products in the IT Operations sector to get you up and running with configuration management quickly! Regardless of the size of your estate, and whether it's desktops or servers, Bunraku gets you started automating your infrastructure, minimising manual tasks, increasing efficiency, and avoiding configuration drift. Puppet implements Infrastructure as Code, a crucial part of DevOps practices, and Foreman gives you a user-friendly graphical interface to ease the day-to-day management of the estate. We've built a solution that's scalable and resilient based on AWS best practices and industry norms. Additionally, we also offer support for implementing and running the solution whether you are just getting started or trying to work through how to build some custom modules.
Launching Bunraku
Please note that the software does not require the use of AWS account root privileges for deployment or operation. The principle of least privilege is followed in regards to all access granted as part of the deployment. An AWS account is needed with permissions to create EC2 instances however no AWS Identity and Access Management (IAM) roles nor IAM policies are needed. Familiarity with AWS in particular the creation of EC2 instances is a prerequisite as is experience of Linux CLI commands. A typical deployment will take a minimum of 8 minutes based on using the recommended m5.large instance type specified below. The AMI allows for a Foreman server or Foreman proxy to be configured, you need to start with a Foreman server however a separate Foreman proxy will not be required initially and can be added at a later date.
Puppetlabs or Puppet Core
With the changes to licensing for Puppet, the option to use Puppet Core has been added to the setup process. For testing and development, this is free for up to 25 nodes, alternatively you will require a license. Please see https://help.puppet.com/osp/current/Content/PuppetCore/access_core_for_test_dev.htm for the process of registering to obtain an API key. Choosing Puppet Core is not a requirement, however the option is there if you wish to. The documentation shows at which point you will need to enter the API key. Please note, if you decide to use Puppet Core, the EC2 instance will require access to the internet to download the required components.
Creating your Bunraku EC2 instance
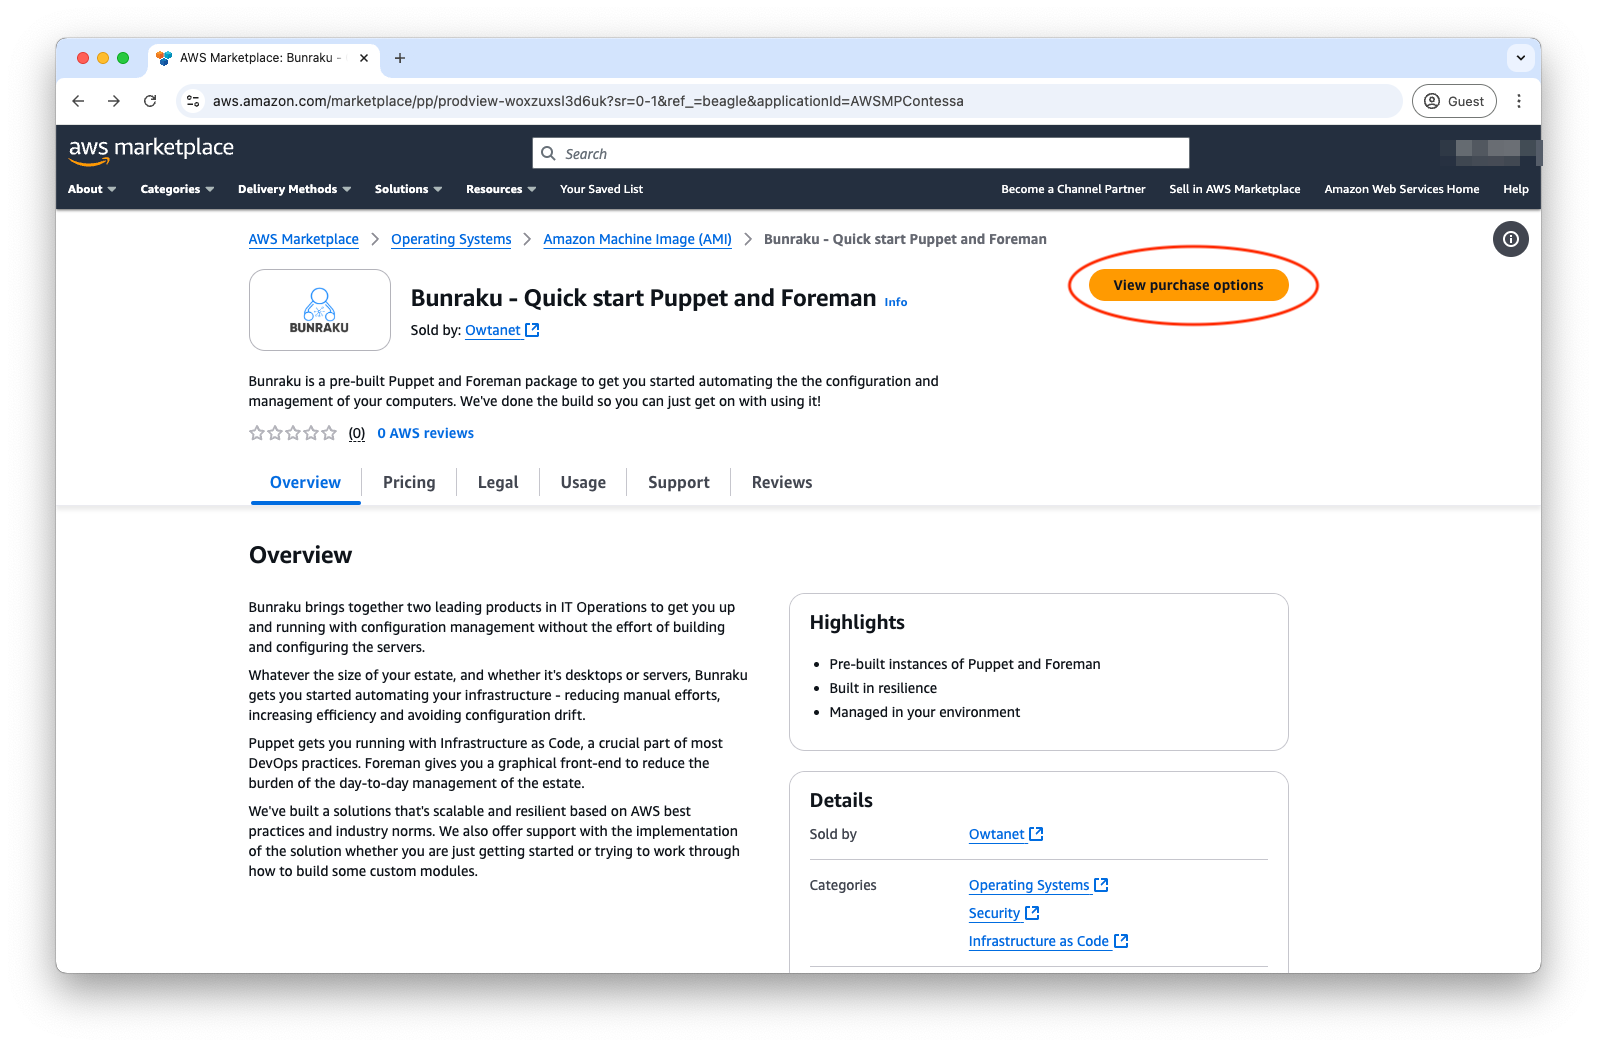
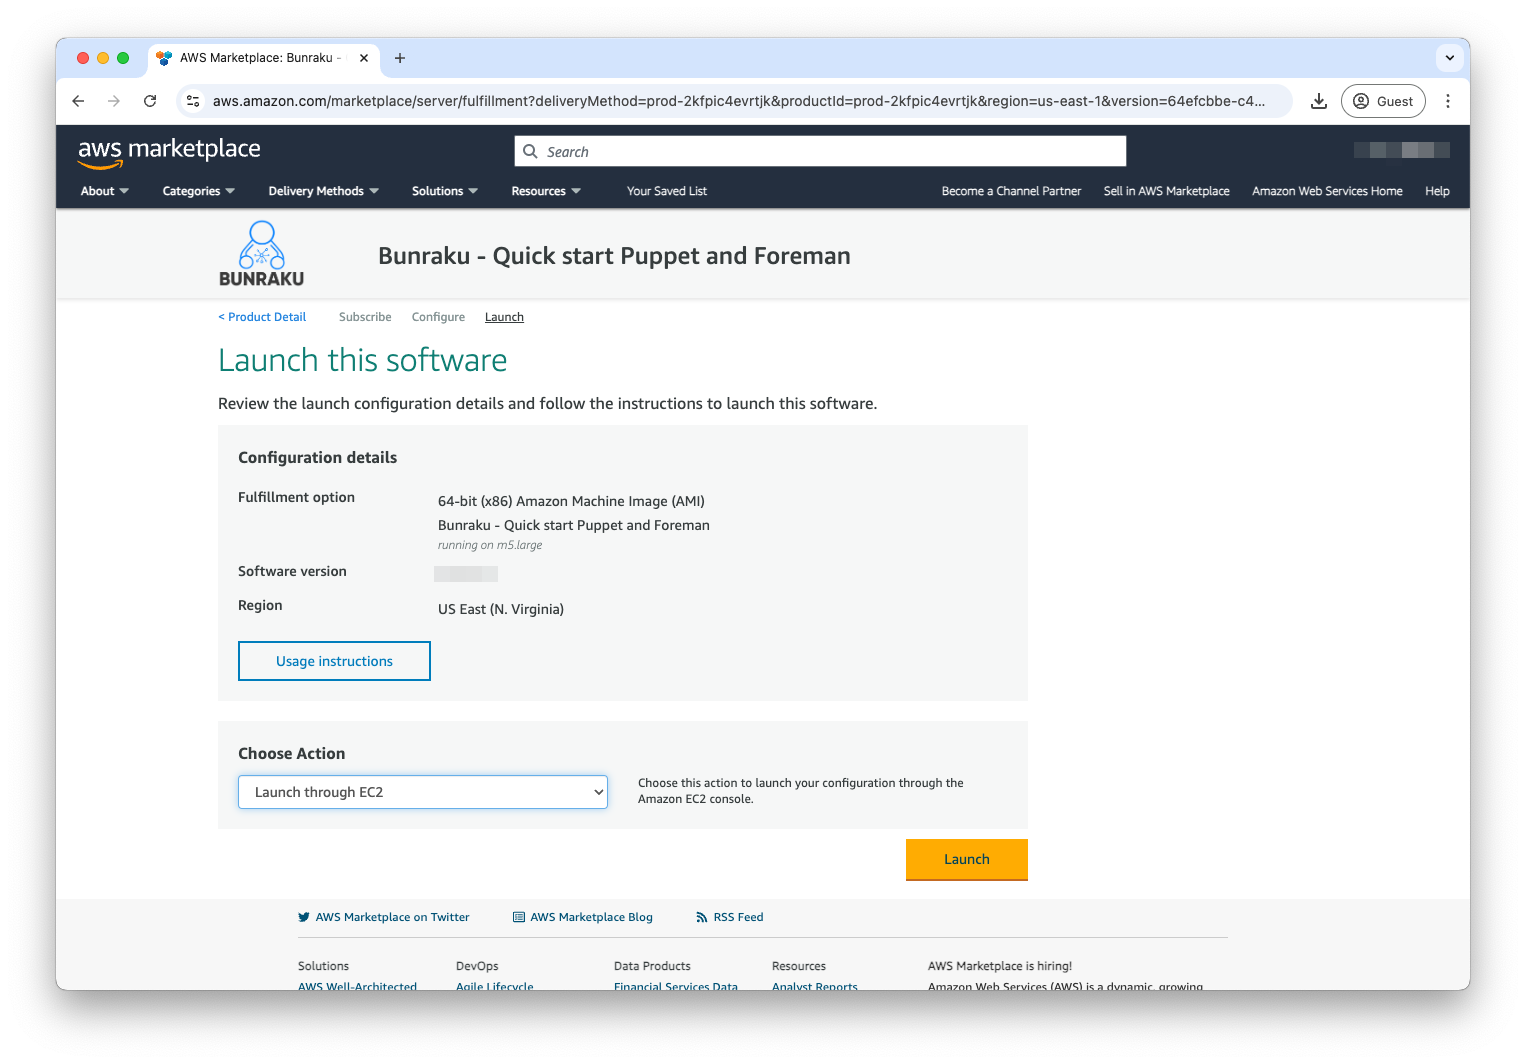
To launch your Bunraku instance, click “View purchase options” from the product page:
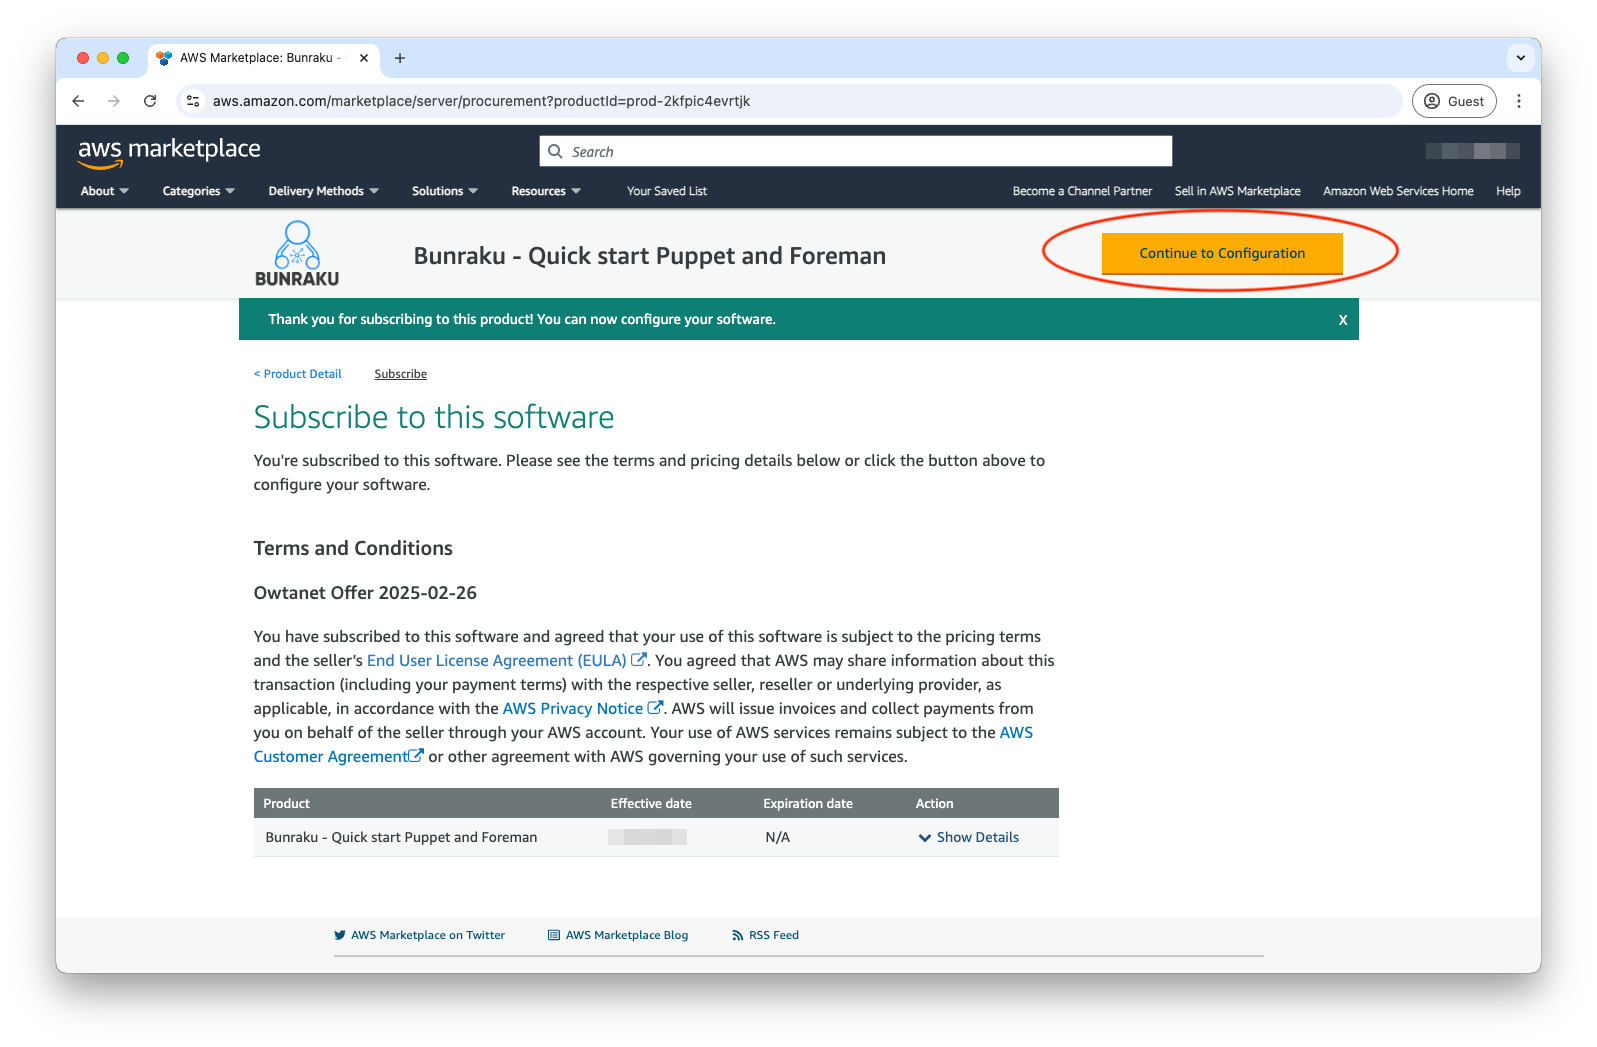
If you agree to the terms, accept them to have the subscription to the product added to your AWS Account.

The process of adding the subscription can take a few moments to complete, in doing so, you can continue to the configuration process.
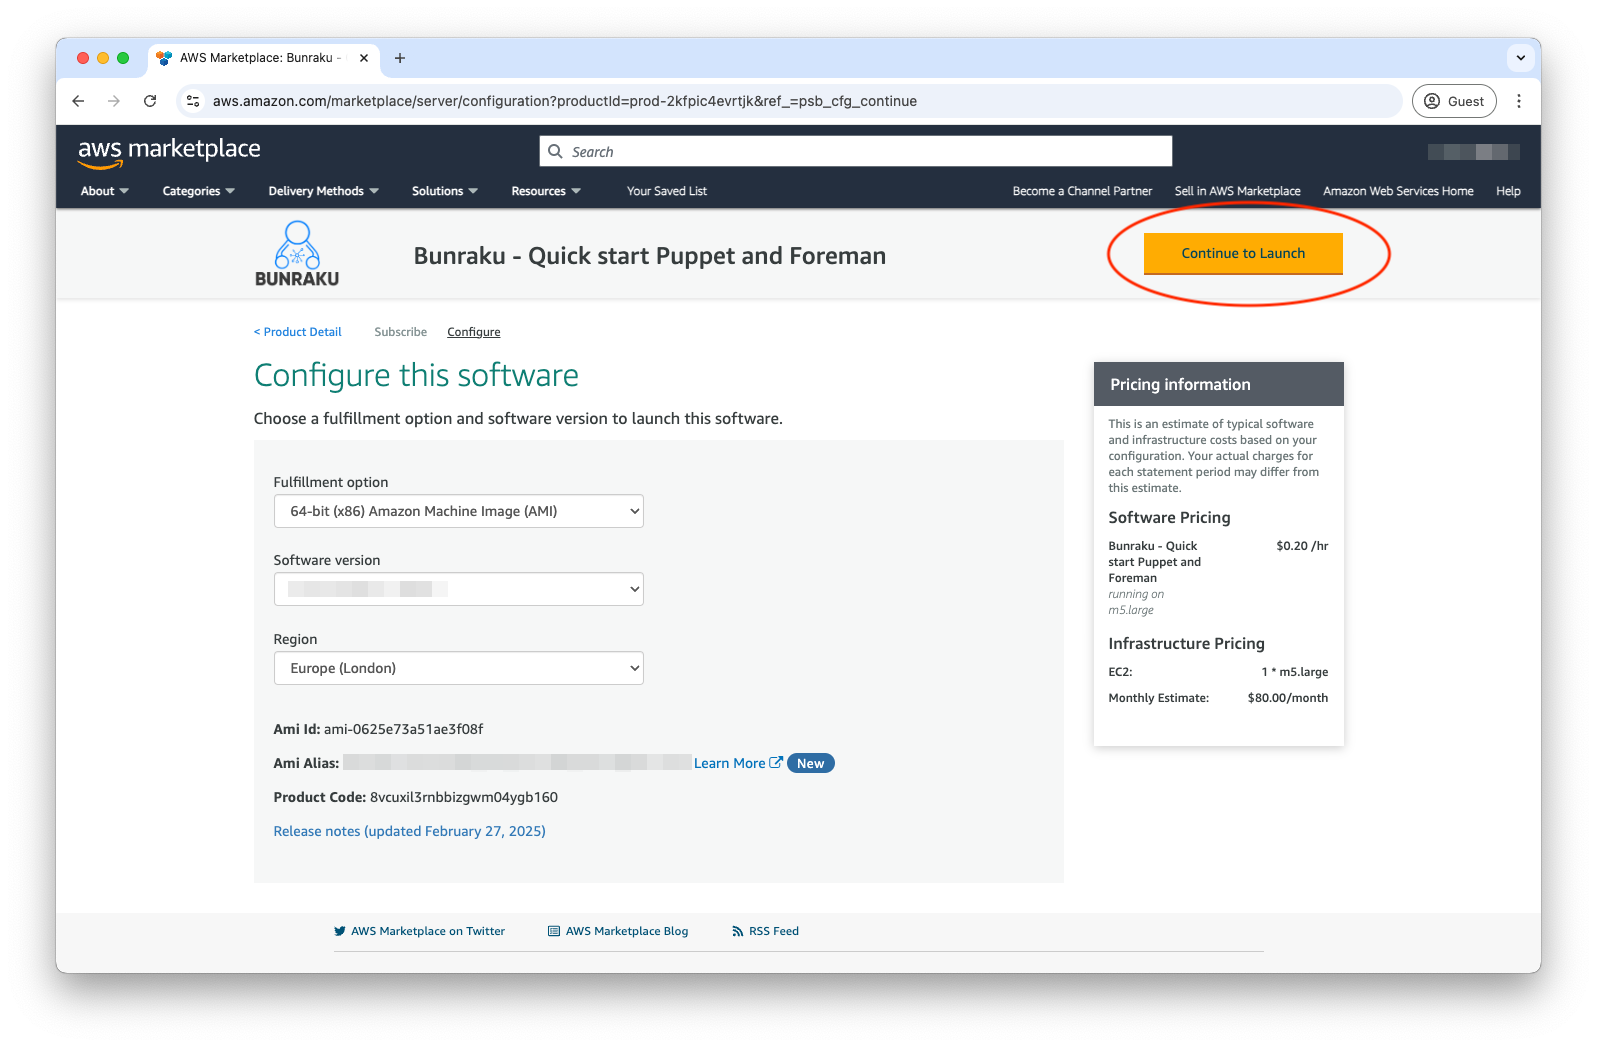
Before you Continue to Launch, pick the version you wish, ideally the latest and the region the instance will reside in.
Launch from Website
If you decide to launch the instance from the AWS Marketplace website, please note disk space will be set to the default 20Gb as there is no option to adjust this.
-
Choose your EC2 Instance type.
-
VPC Settings - use the desired VPC for the region you selected.
-
Subnet Settings - use the desired subnet for the VPC.
-
Create a Security group, the initial required ports will be added and should be modified to restrict access, remember to save. The security group can be altered once the Instance is launched.
-
tcp/443 - Web interface, restrict to trusted sources.
-
tcp/22 - SSH, restrict to trusted sources.
-
tcp/8140 - Puppet server, restrict to trusted sources.
-
-
Choose a Key pair to use for the Instance, alternatively create a new one.
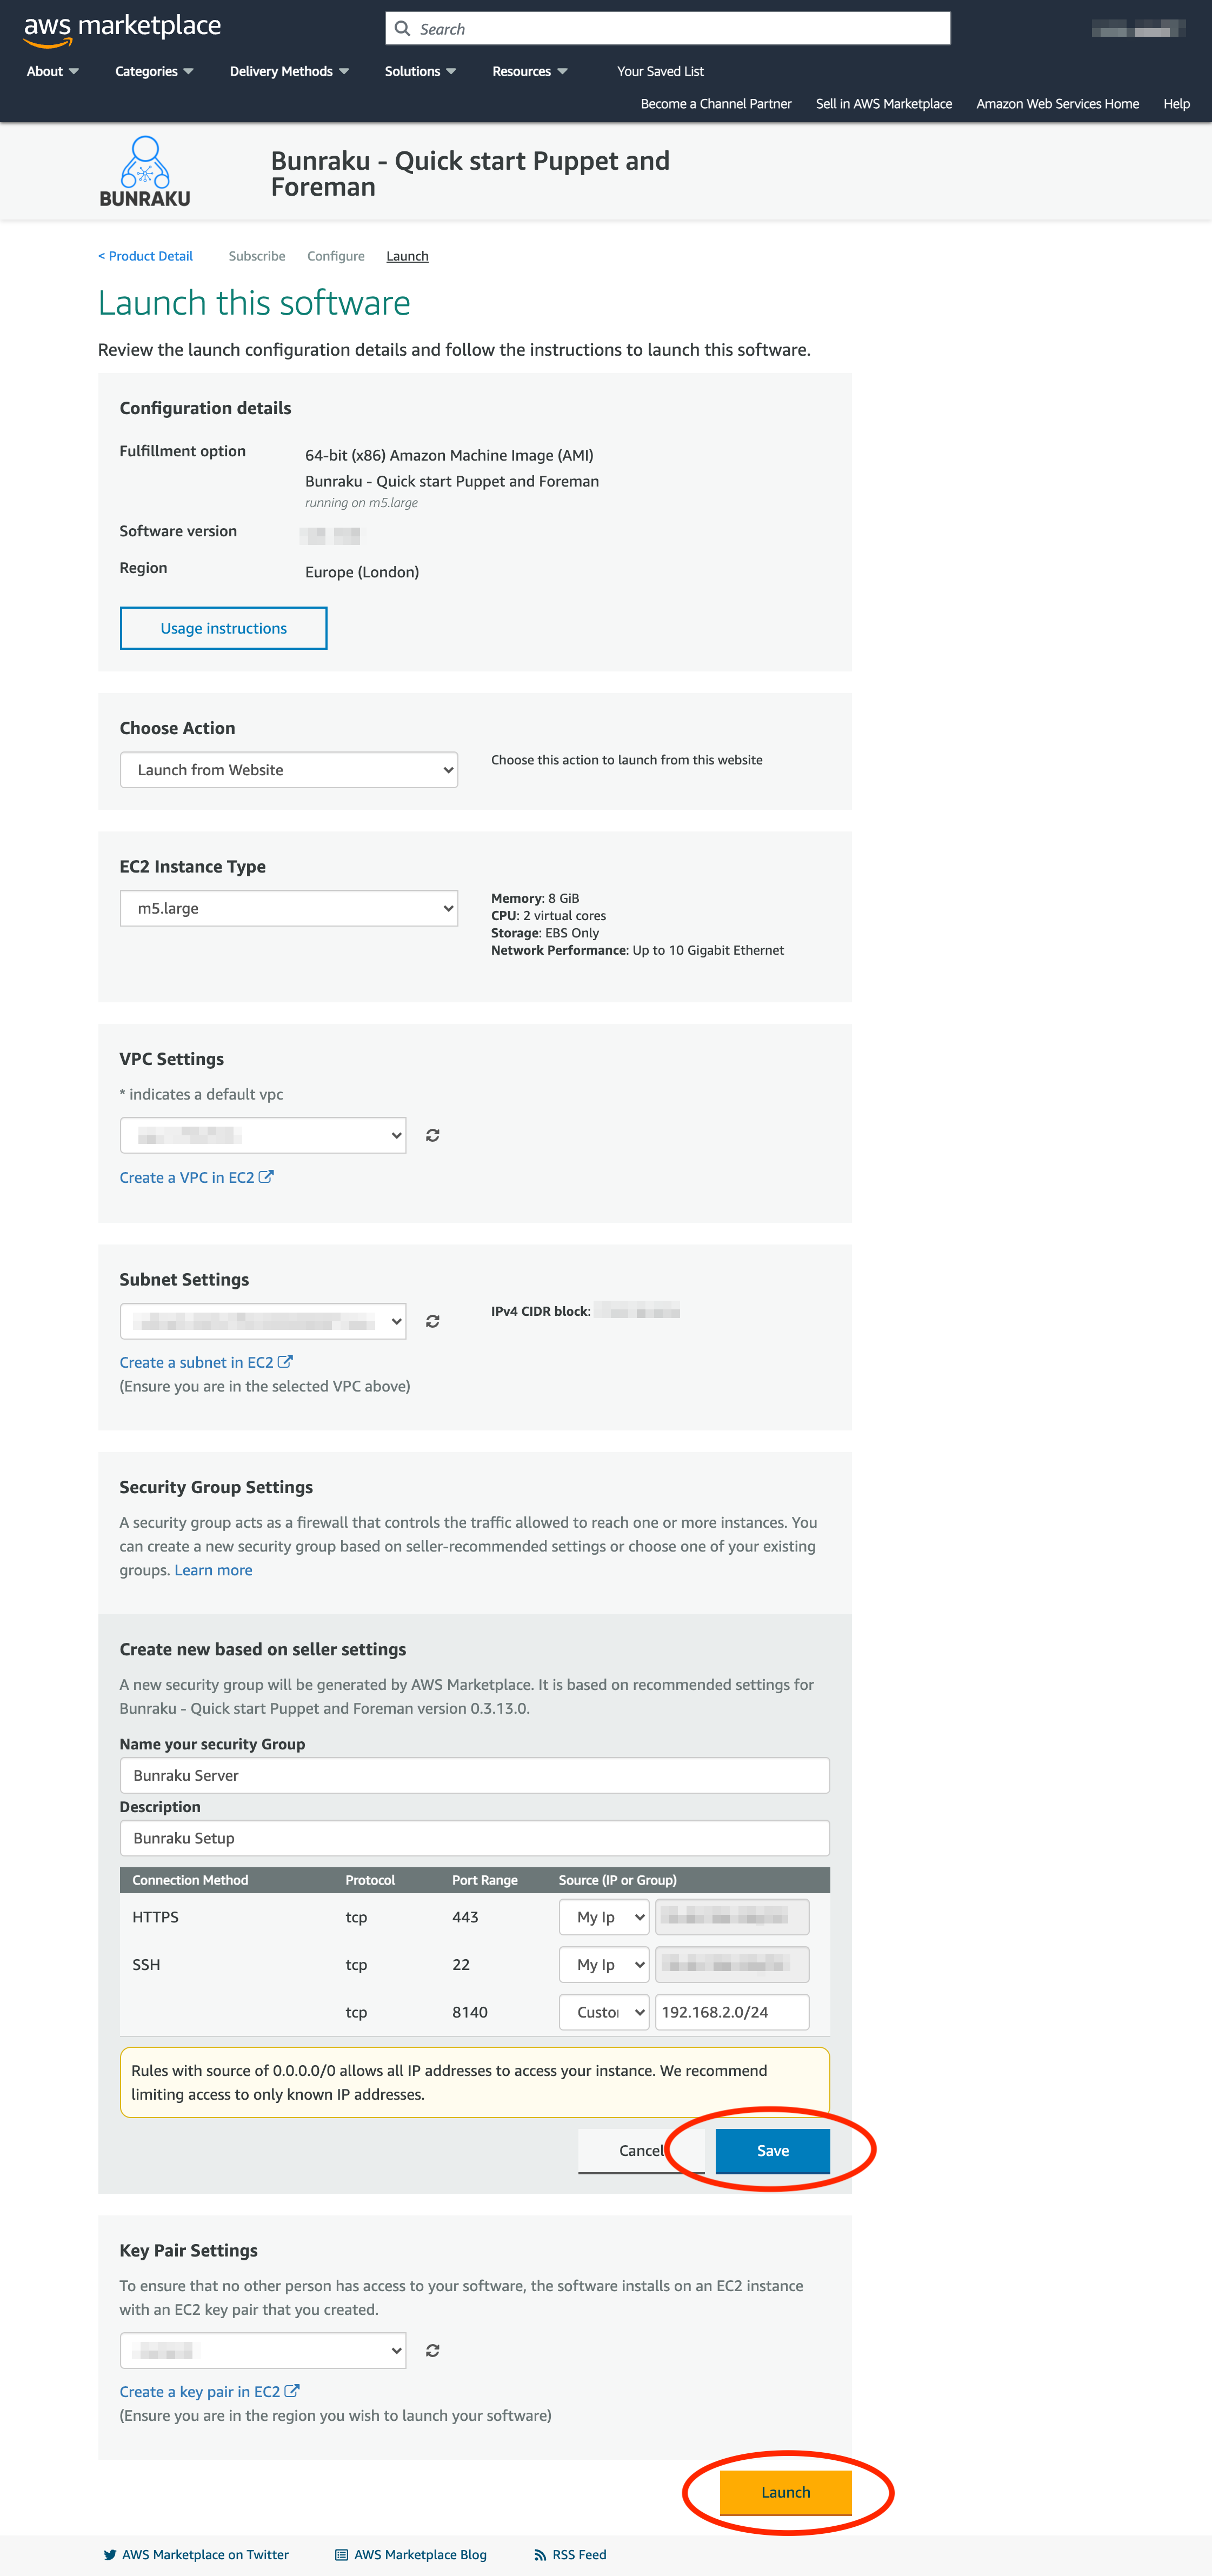
Clicking Launch will create the Bunraku instance.
Launch through EC2
If you launch through EC2, you will have greater control over the initial settings as you do when creating EC2 instances. This method allows you to allocate more storage.
Once you launch this method, a new window is opened and takes you to the standard Launch an instance page. It will pre-populate the AMI to use along with some initial rules for the security group.
-
Name - Supply a name and add any additional tags you may use.
-
Instance type.
-
Key pair - Choose a Key pair to use for the Instance, alternatively create a new one.
-
Network settings - Use Edit to customise the VPC and subnet to launch in.
-
Firewall (security groups).
-
Restrict access to SSH.
-
Restrict access to CUSTOMTCP (tcp/8140 - puppet server).
-
HTTPS - update to restrict access once launched or disable initially.
-
-
-
Configure storage - The default image size is 20Gb, you will require more than this over time. Allocate storage now or alter in the future.
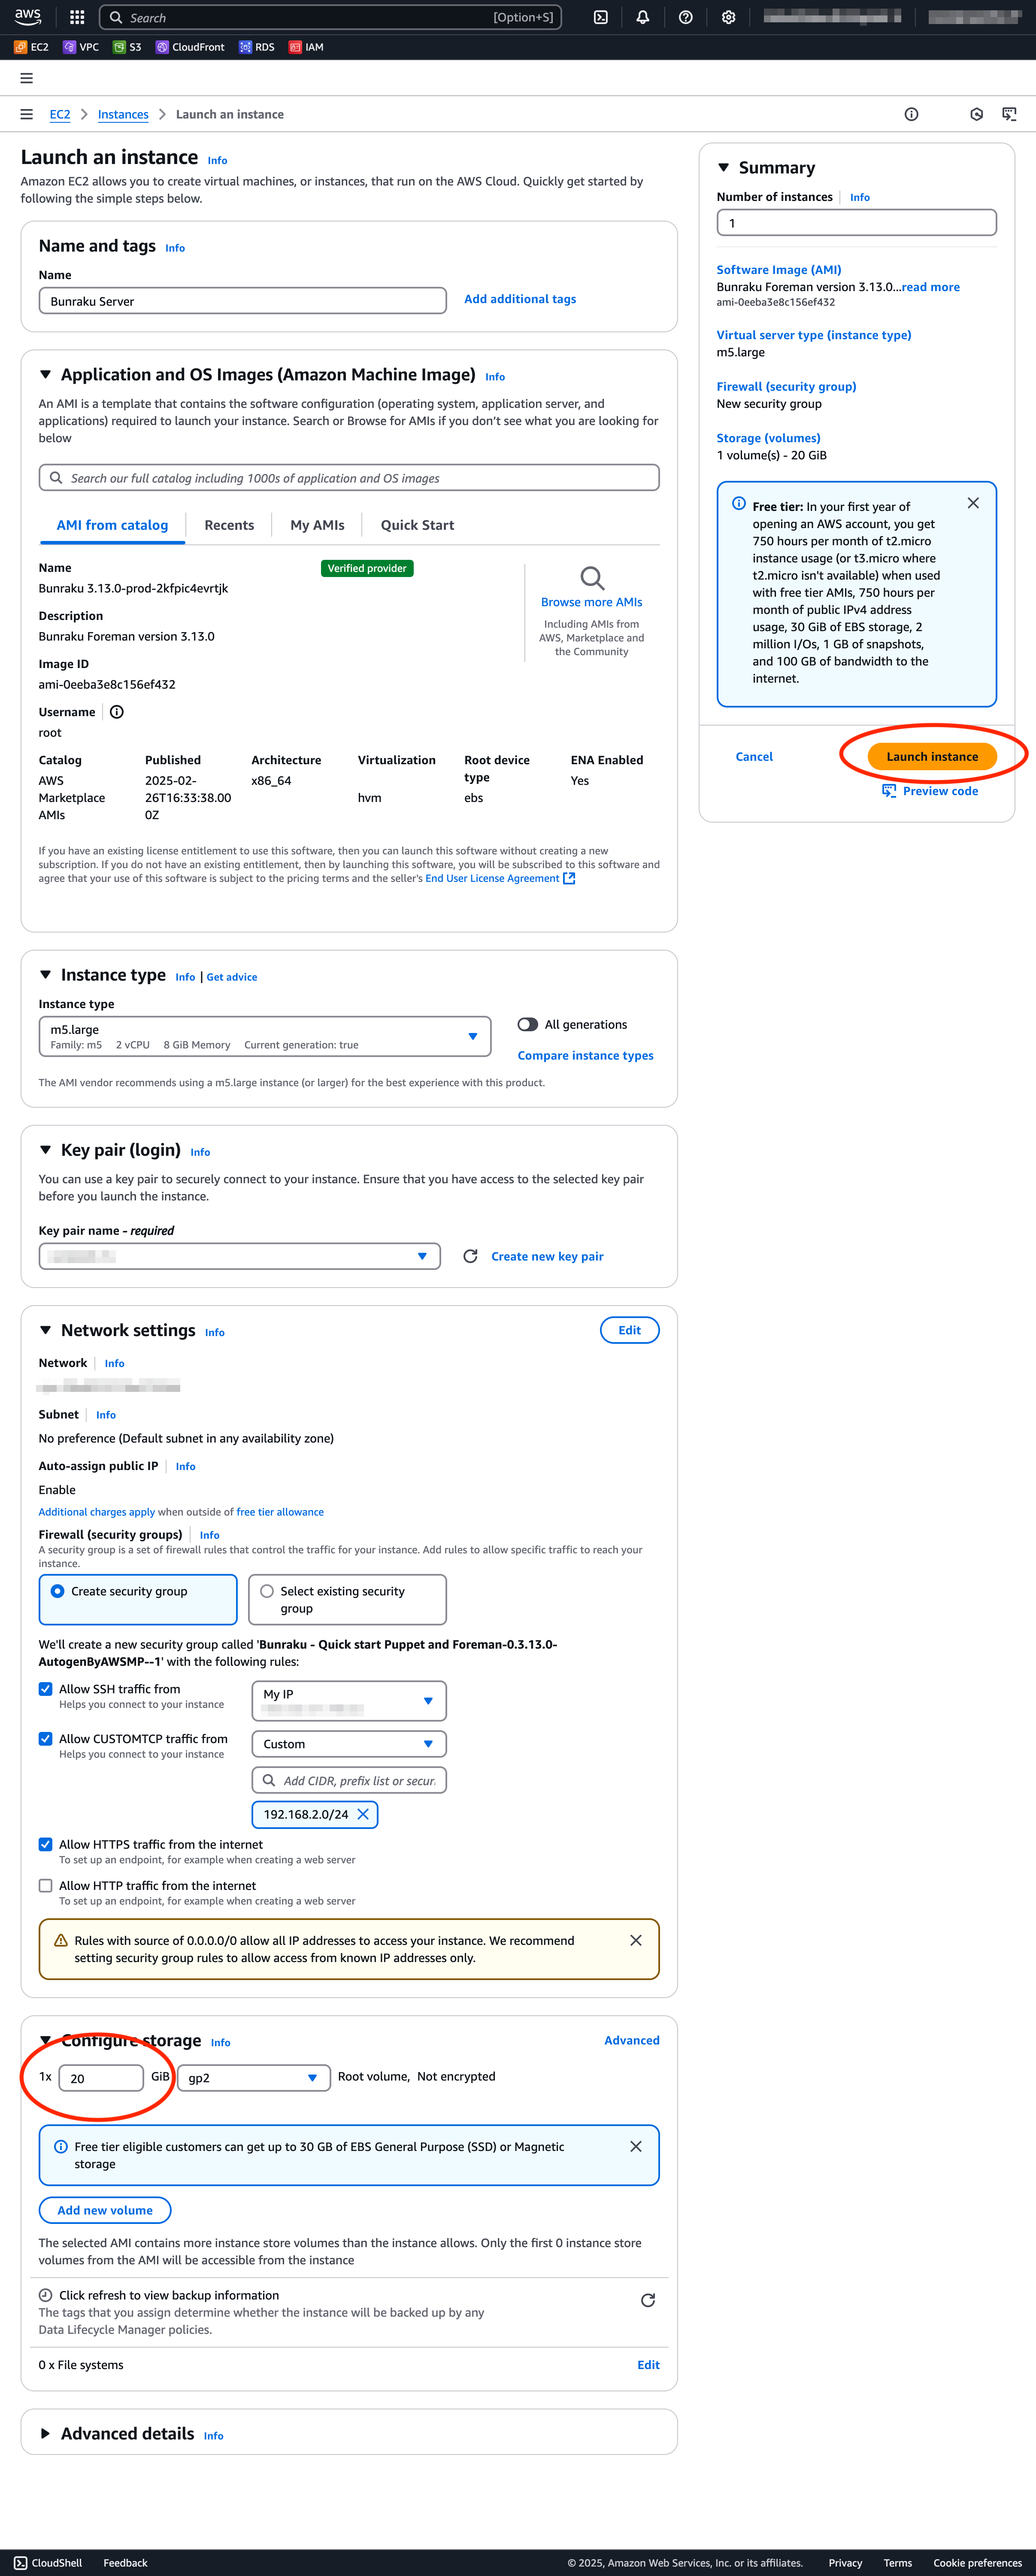
Clicking Launch instance will launch the Bunraku instance in the desired VPC and subnet.
Option 1: Foreman server setup
A Foreman server instance should have a security group that allows access for the following:
|
Port |
Access |
Purpose |
|---|---|---|
|
tcp/22 |
Trusted source IPs |
Remote shell access (SSH) |
|
tcp/443 |
Trusted source IPs |
Foreman web interface (HTTPS) |
|
tcp/8140 |
Puppet hosts |
Puppet agent connections |
The security group will look similar to this:

First Login
Using your preferred SSH client, connect to the Foreman server as the user ubuntu using the Public IPv4 address or Public IPv4 DNS provided in the instance summary, replace sshkey with the name of your key pair.
ssh -i "sshkey" ubuntu@Public_IPv4_address
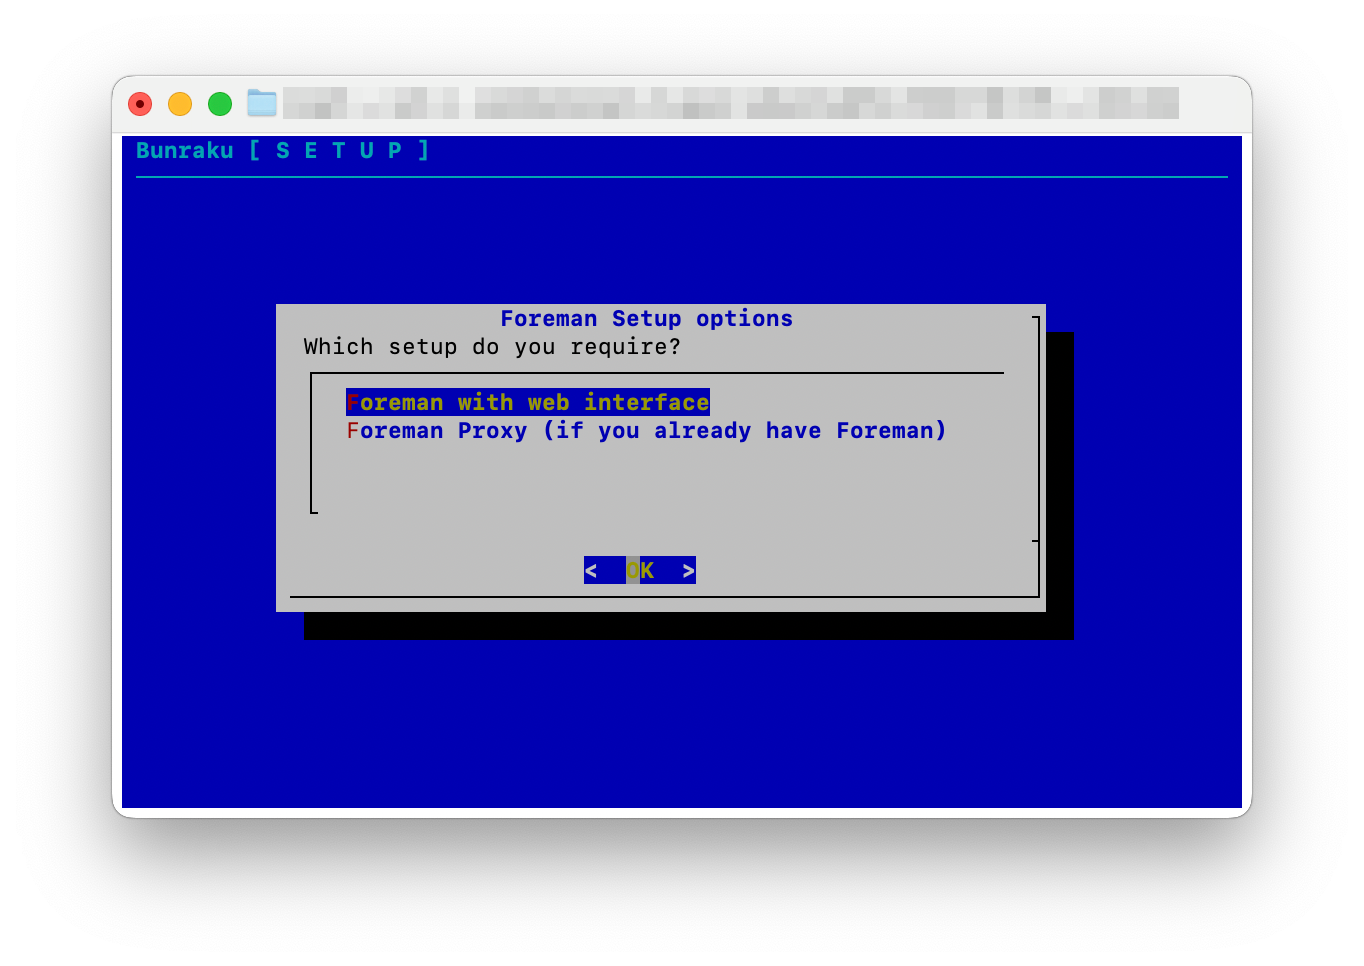
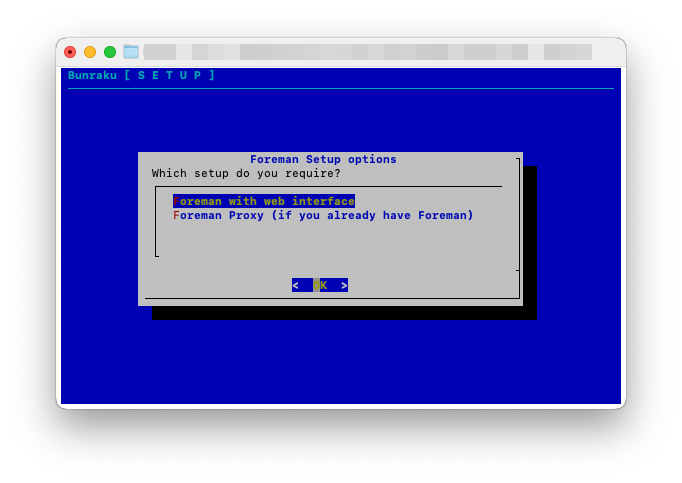
Note: During the following screens, use the arrow keys and enter to select options
As this is the first system, choose to install Foreman with its web interface.
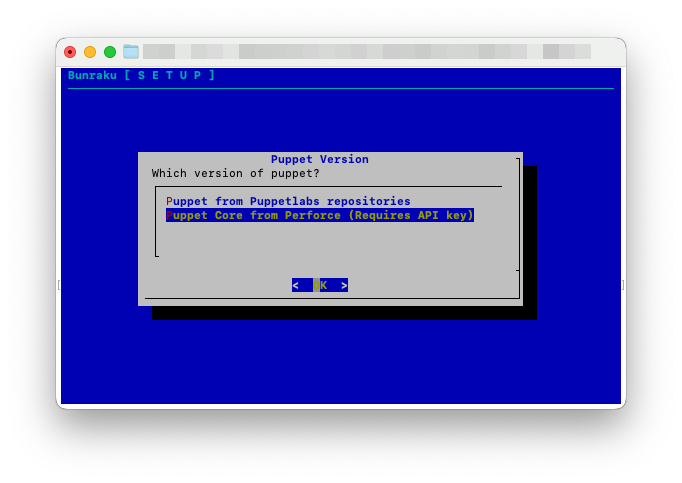
Puppetlabs or Puppet Core
Select the version of Puppet to use, either Puppet from Puppetlabs or upgrade to Puppet Core. If you decide to use the Puppetlabs version, skip ahead to Initial Setup
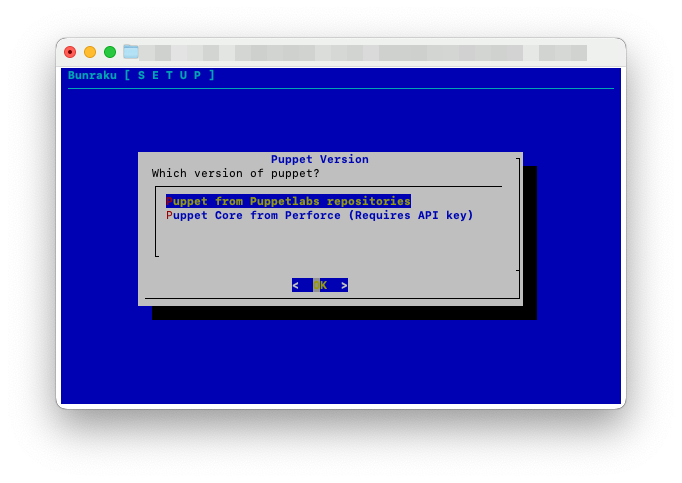
Puppet Core
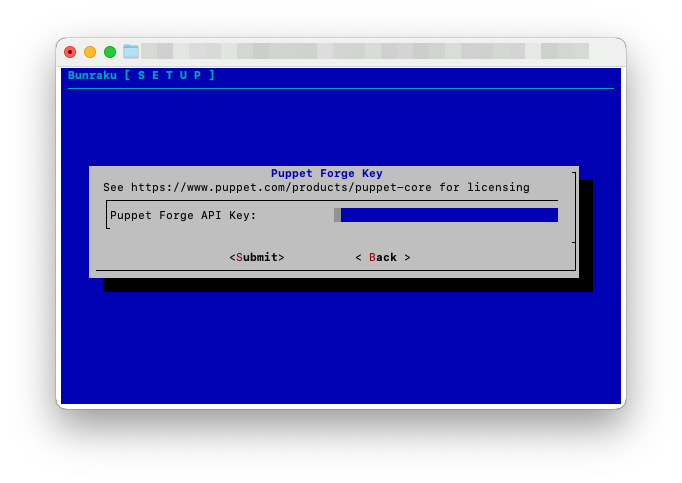
Select Puppet Core from Perforce then select OK. If you use more than 25 nodes we offer Puppet core licences. To purchase these, get in touch with us for a quote here
You will be asked for the API key you have generated at https://forge.puppet.com. Paste this in and use Submit to move onto the Initial Setup
Initial Setup
The setup for Foreman requires the following details:
-
System Hostname: This is the hostname you will use to access Foreman, it is also the name added to SSL certificates and to the Puppet Server CA. The setup does a quick lookup to see if it can identify a hostname from the systems IP, this can be changed to any valid FQDN with corresponding DNS records.
-
Alternative System Hostname: If you are deploying a Foreman Server and one or more Proxies, an alternative name is required that can be shared by the Foreman Server and Proxies. This allows requests to be load balanced between Foreman Proxy processes, a simple method for this would be to use DNS RR. This alternative hostname is then used by the Puppet agent as the
servername in its configuration. -
First admin username: This is the admin user created as the first user. It is automatically populated, but can be changed.
-
Admin password: This is the password that goes with the first admin username. It is automatically populated, but can be changed.
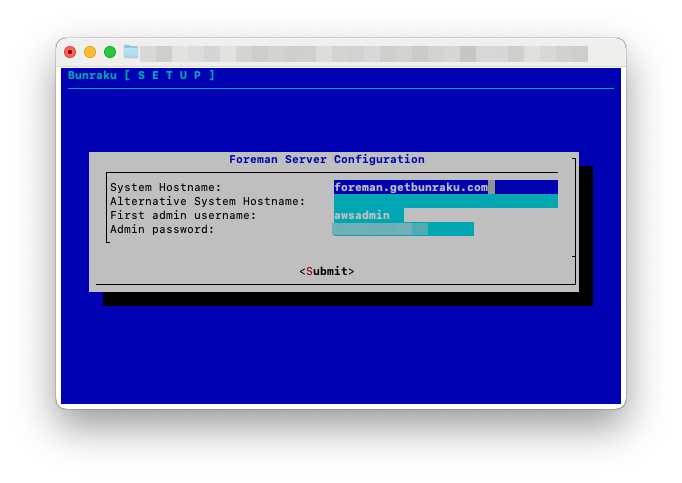
When you select Submit, the configuration to use will be displayed, pick restart to change the details provided. Otherwise Continue.

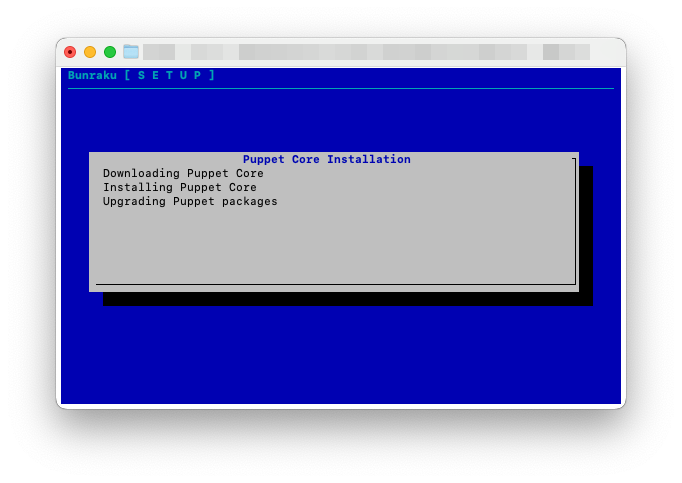
If you chose to use Puppet Core, this will now be installed and some components upgraded. Internet access is required for this to complete due to no Puppet Core components being stored on the EC2 instance.
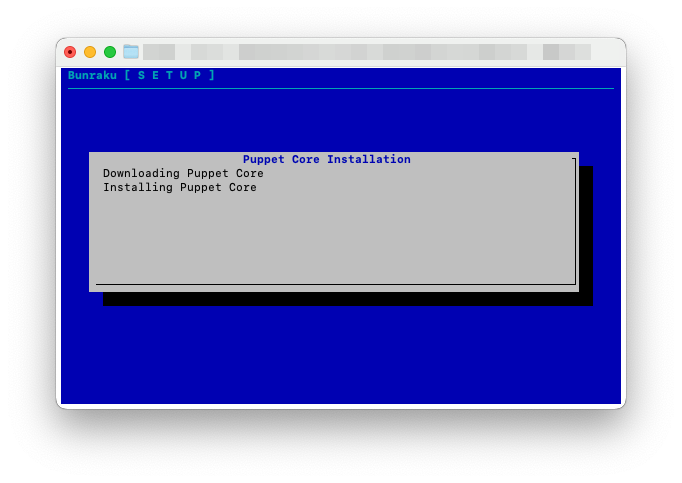
The upgrade process can take a few moments to complete
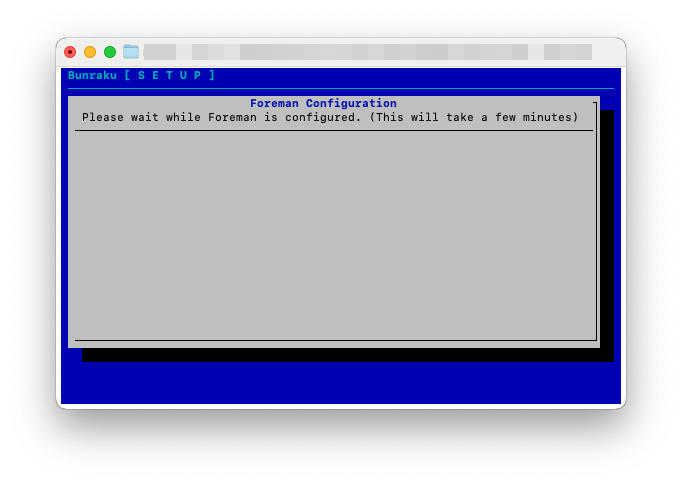
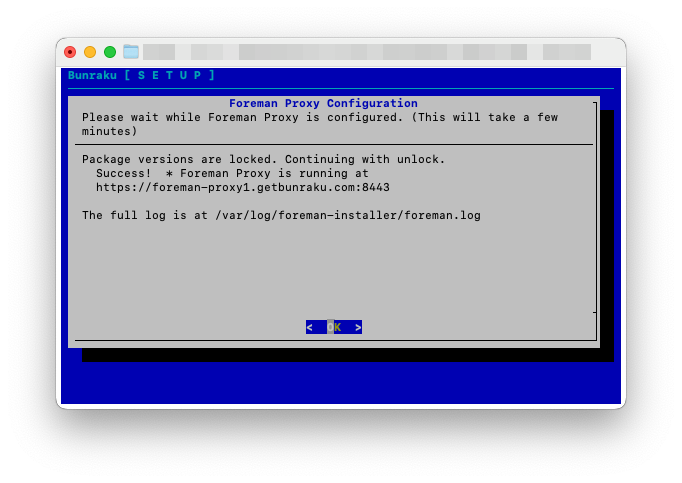
Foreman will now be configured. This will take around 10 minutes to complete
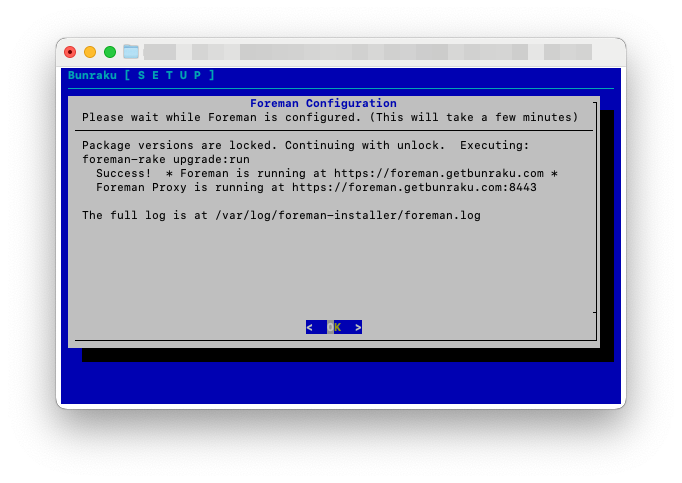
Once the configuration is complete, it will display the URL where the Foreman web interface can be accessed.
Pressing enter will log you out of the session.
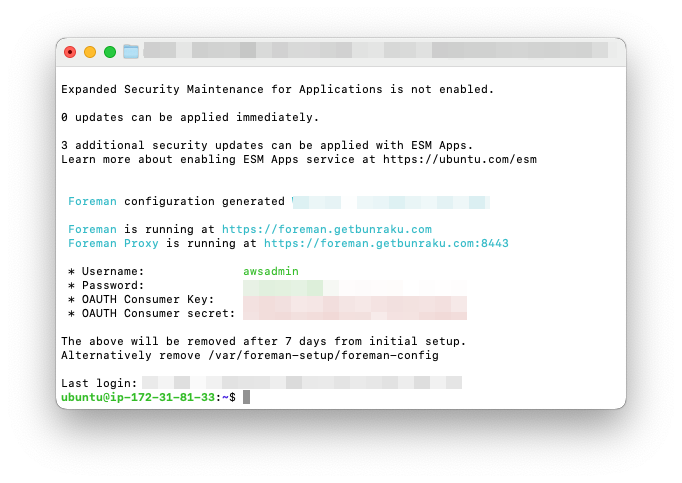
Login after setup
The next time you login via ssh, you will receive a traditional shell that includes the configuration details, this will display for 7 days after which the information will be deleted. Alternatively remove the file /var/foreman-setup/foreman-config
Option 2: Foreman proxy setup
As a minimum, the instance requires 2 CPUs and 4Gb of RAM (t3.medium).
You must have a Foreman server configured and running before creating a Foreman Proxy. Adding a Proxy allows you to distribute puppetserver processes across multiple systems, this is useful when you have several hundred or more hosts to manage. (Proxy servers can be created in different Availability Zones).
Create the Instance
Launch a new Bunraku instance as per the process followed for the Foreman Server making sure to adjust the security group policies allowing access for the proxy services
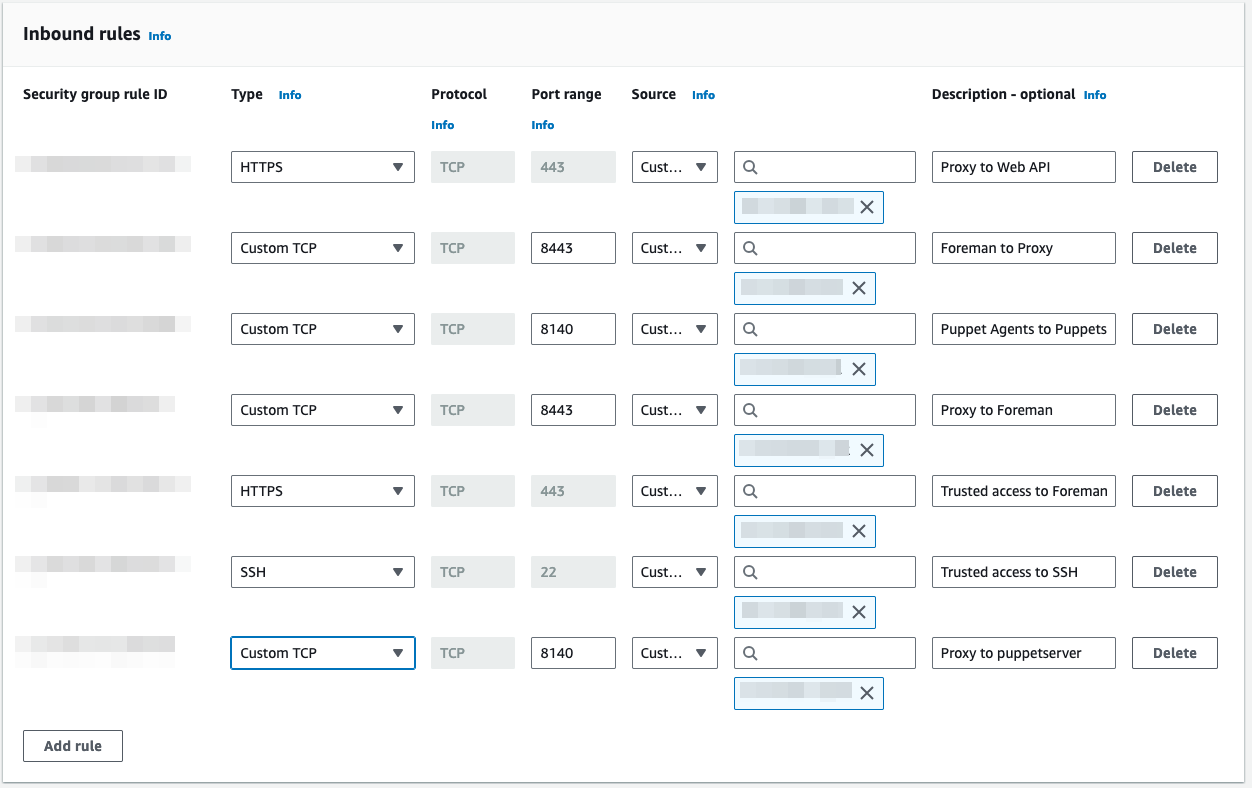
A Foreman Proxy instance should have a security group that allows access for the following:
|
Port |
Access |
Purpose |
|---|---|---|
|
tcp/22 |
Trusted source IPs |
Remote shell access (SSH) |
|
tcp/443 |
Trusted source IPs |
Foreman web interface (HTTPS) |
|
tcp/8140 |
Puppet hosts |
Puppet agent connections |
|
tcp/8443 |
Foreman Proxy and Server |
Each Foreman server and proxy needs to be added |
The security group will look similar to this:
NOTE: If the VPC utilises DNS settings of AmazonProvidedDNS and no custom domain is used, use Private IPv4 Addresses for systems located within the same VPC.
First Login
Using your preferred SSH client, connect to the Foreman server as the user ubuntu using the Public IPv4 address or Public IPv4 DNS provided in the instance summary, replace sshkey with the name of your key pair.
ssh -i "sshkey" ubuntu@Public_IPv4_address
To complete the setup, access the system via SSH to automatically launch the the Foreman setup, from the options, chose Foreman Proxy. You will need a Foreman server to be running and have its hostname and correct OAUTH Consumer key and secret to complete the setup successfully.
Foreman Proxy Configuration
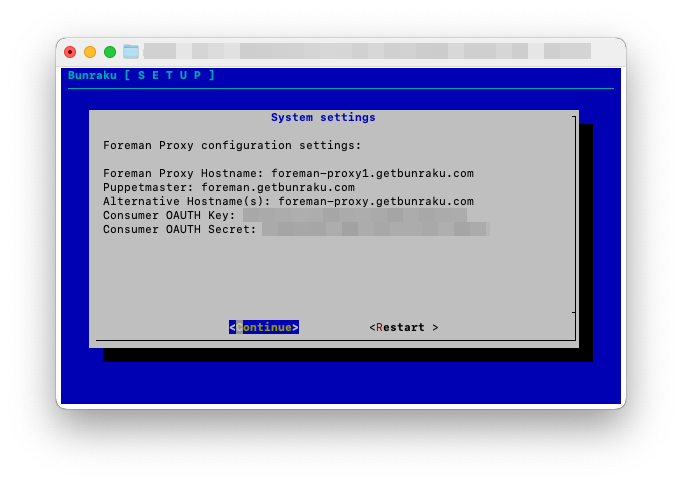
The setup for the Foreman Proxy requires the following details:
-
System Hostname: This is the hostname of the Proxy. The setup does a quick lookup to see if it can identify a hostname from the systems IP, this can be changed to any valid FQDN with corresponding DNS records.
-
Alternative System Hostname: If you are deploying a Foreman Server and one or more Proxies, an alternative name is required that can be shared by the Foreman Server and Proxies. This allows requests to be load balanced between Foreman Proxy processes, a simple method for this would be to use DNS RR. This alternative hostname is then used by the Puppet agent as the
servername in its configuration. -
Puppetmaster Hostname: This is the hostname of the Foreman Server that has already been setup.
-
OAUTH Consumer key: This is a key that has been generated on the Foreman server, if you did not record it, log into the CLI of the Foreman server and check
/etc/foreman-installer/scenarios.d/foreman-answers.yaml -
OAUTH Consumer secret: This is the secret for the key that has been generated on the Foreman server, if you did not record it, log into the CLI of the Foreman server and check
/etc/foreman-installer/scenarios.d/foreman-answers.yaml
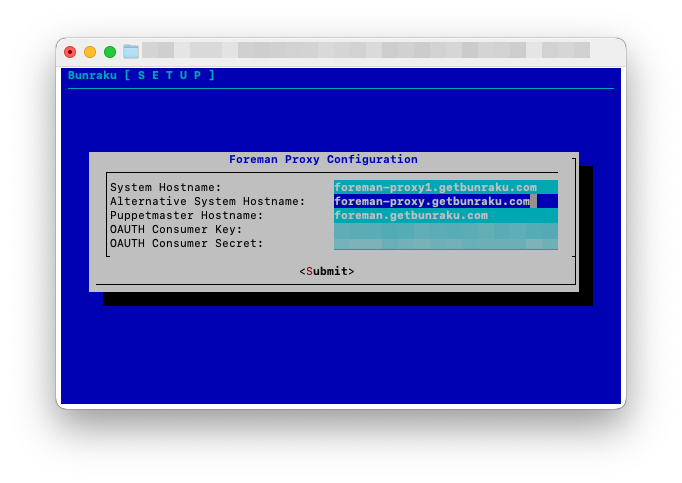
Once you have entered the details, click on Submit.
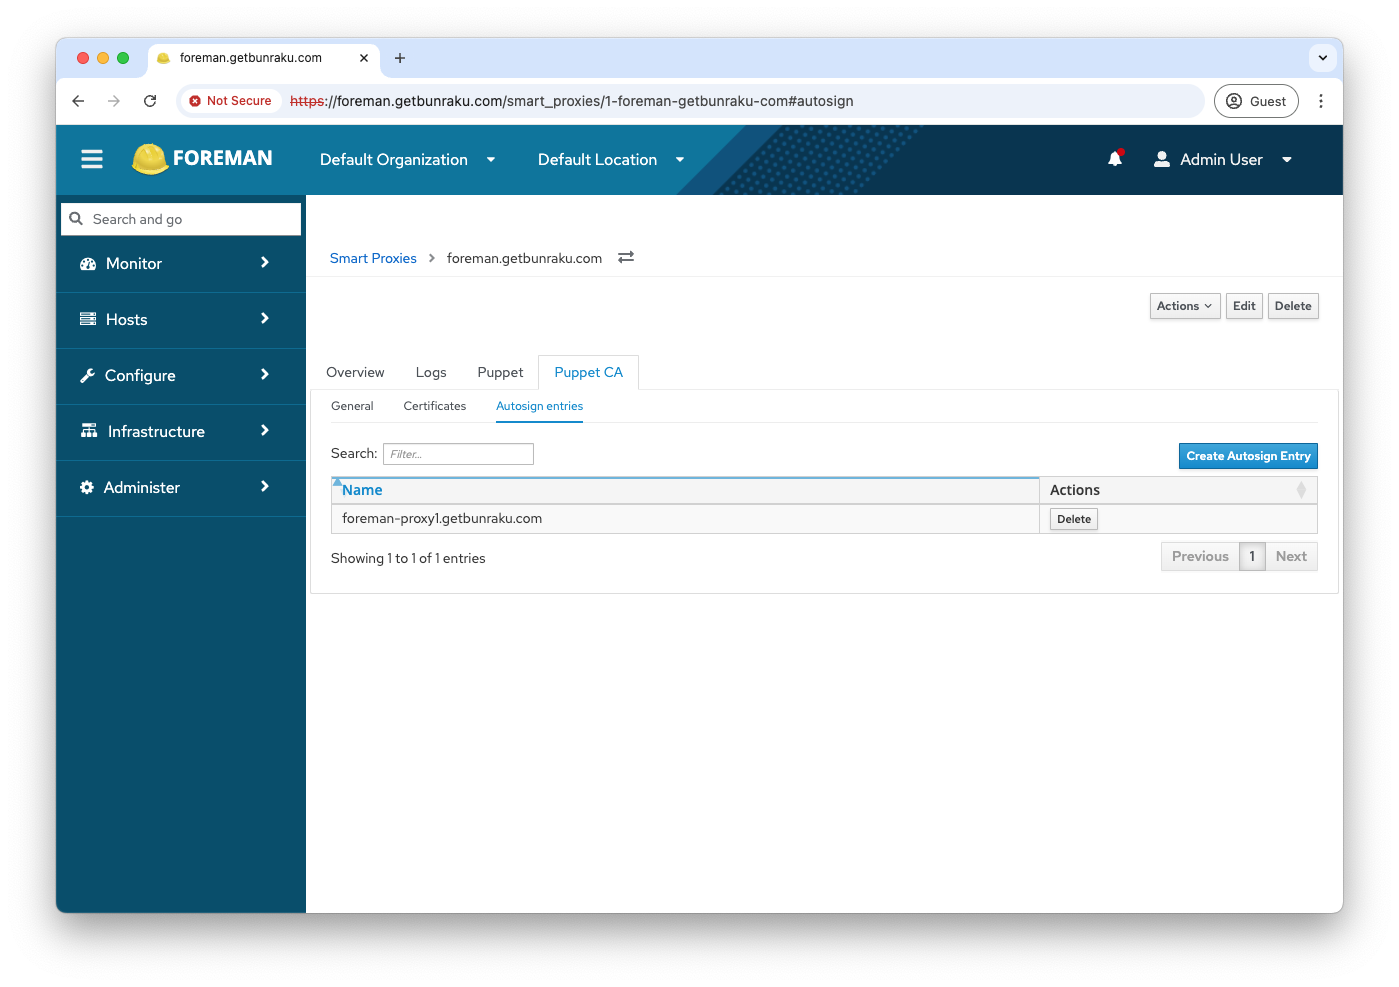
Adding an auto-sign entry
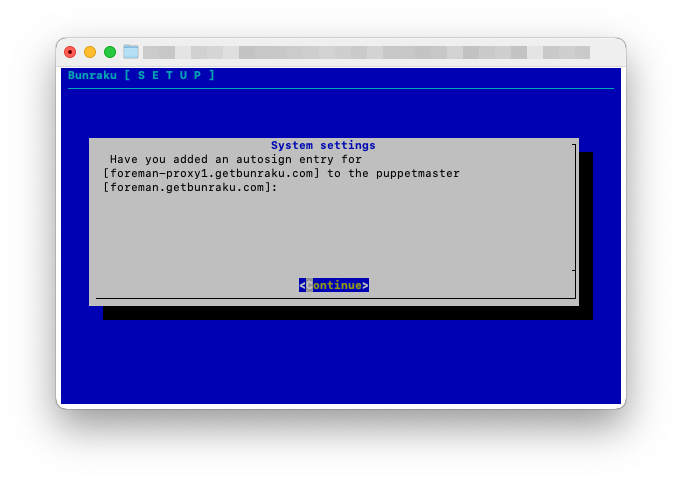
To simplify the setup, log into the Foreman interface and add an autosign entry for the hostname of the Foreman Proxy. This will allow the initial puppet agent execution to run seamlessly. To add the auto sign entry, go to: Infrastructure > Smart Proxies > Select the Smart Proxy running Puppet CA > Puppet CA > Create Autosign Entry:
Alternatively, you can sign the certificate request via the CLI or GUI on the Foreman server once the puppet agent has generated the request.
GUI
Go to: Infrastructure > Smart Proxies > Select the Smart Proxy running Puppet CA > Puppet CA > Certificates and click the Sign button in the Actions column.
CLI
ssh to the Foreman server and run the command, replacing <client hostname> with the name of your Foreman proxy.
sudo puppetserver ca sign --certname <client hostname>
Verify details
Check the details below and click on ‘Continue’, if anything is incorrect click ‘Restart’:
On completion of the puppet client configuration, Foreman will be configured as a Proxy and additional puppet server. Once complete, selecting OK will close the session below:
Upgrades
When new versions of Foreman are released you can upgrade in one of 2 ways:
1.You can deploy a new version of the AMI using foreman_maintain to create a backup. Details can be found here
2.Upgrade from the Foreman server via the CLI following the published upgrade procedure from https://theforeman.org.
Support
To request technical support for Bunraku please send an email to support@getbunraku.com to create a Jira account. You will then be able to log a ticket via the support portal. The initial response SLA to a support issue being raised is one business day. Please note that Bunraku support is currently one tier only.
Technical support for Bunraku is included for bugs and we are imminently going to launch a professional services product in AWS Marketplace for people who require implementation consultancy.
Licencing, costs and billing
Our charging for Bunraku is simple and based on product cost per hour for the running solution. We charge $0.20 per hour for instance types ending in medium, large or xlarge and we charge $0.30 per hour for instances types ending in .2xlarge or .4xlarge.
You will also be charged EC2 and storage costs for the consumed resources.
There is a cost calculator on the product page: https://aws.amazon.com/marketplace/pp/prodview-woxzuxsl3d6uk
Technical support for the solution is included for bugs and we are imminently going to launch a professional services product in AWS Marketplace for people who require implementation consultancy.
Foreman is licensed by the GNU General Public License v3.0. Details can be found here
Troubleshooting
Foreman Server problems
-
Unable to access Foreman GUI
-
Check security group configuration allows access to HTTPS.
-
-
Forgotten admin credentials
Unless you have changed the initial admin credentials, they can be obtained from a configuration file on the Foreman instance that has just been configured.
sudo grep initial_admin_username /etc/foreman-installer/scenarios.d/foreman-answers.yaml
initial_admin_username: awsadmin
sudo grep initial_admin_password /etc/foreman-installer/scenarios.d/foreman-answers.yaml
initial_admin_password: xxxxxxxxxxxxxxx
-
Database password reset
The database password for foreman can be updated from the default that is set as part of the configuration process. As an example:
tr -dc A-Za-z0-9 </dev/urandom | head -c 30 # new_password
sudo -u postgres psql
ALTER USER foreman WITH PASSWORD 'new_password';
sudo vi /etc/foreman/database.yml
#  Update password and save changes
sudo systemctl restart foreman.service
Foreman Proxy problems
-
During the proxy setup, the setup indicates ports 443, 8140 or 8443 are not accessible.
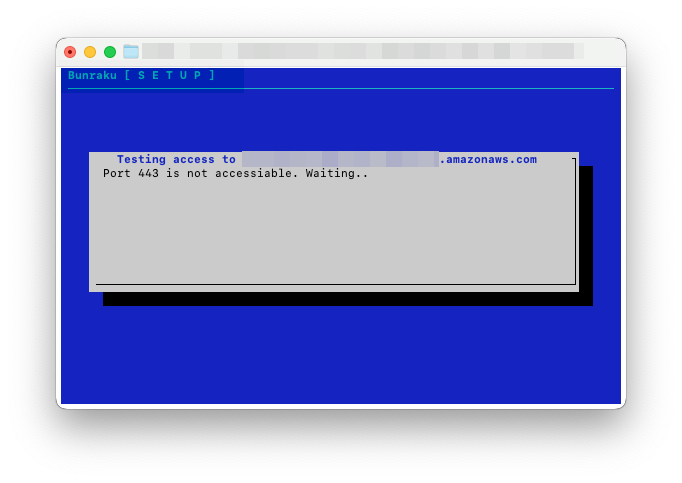
-
Check the security group for the Foreman server allows access from the address of the Proxy instance, if the Foreman server instance is using an AWS Public IPV4 DNS address like
ec2-1-2-3-4.eu-west-1.compute.amazonaws.comadd Private IPv4 addresses to the security group for your Server and Proxy
-
Security, keys and encryption
A key pair is required in order to securely connect to your instance whereas SSL encryption is used to connect to the Foreman interface. Customer data including login credentials are stored in the software on the EC2 instance. Bunraku does not currently integrate with any AWS services that use programmatic system credentials.
Maintenance/Miscellaneous
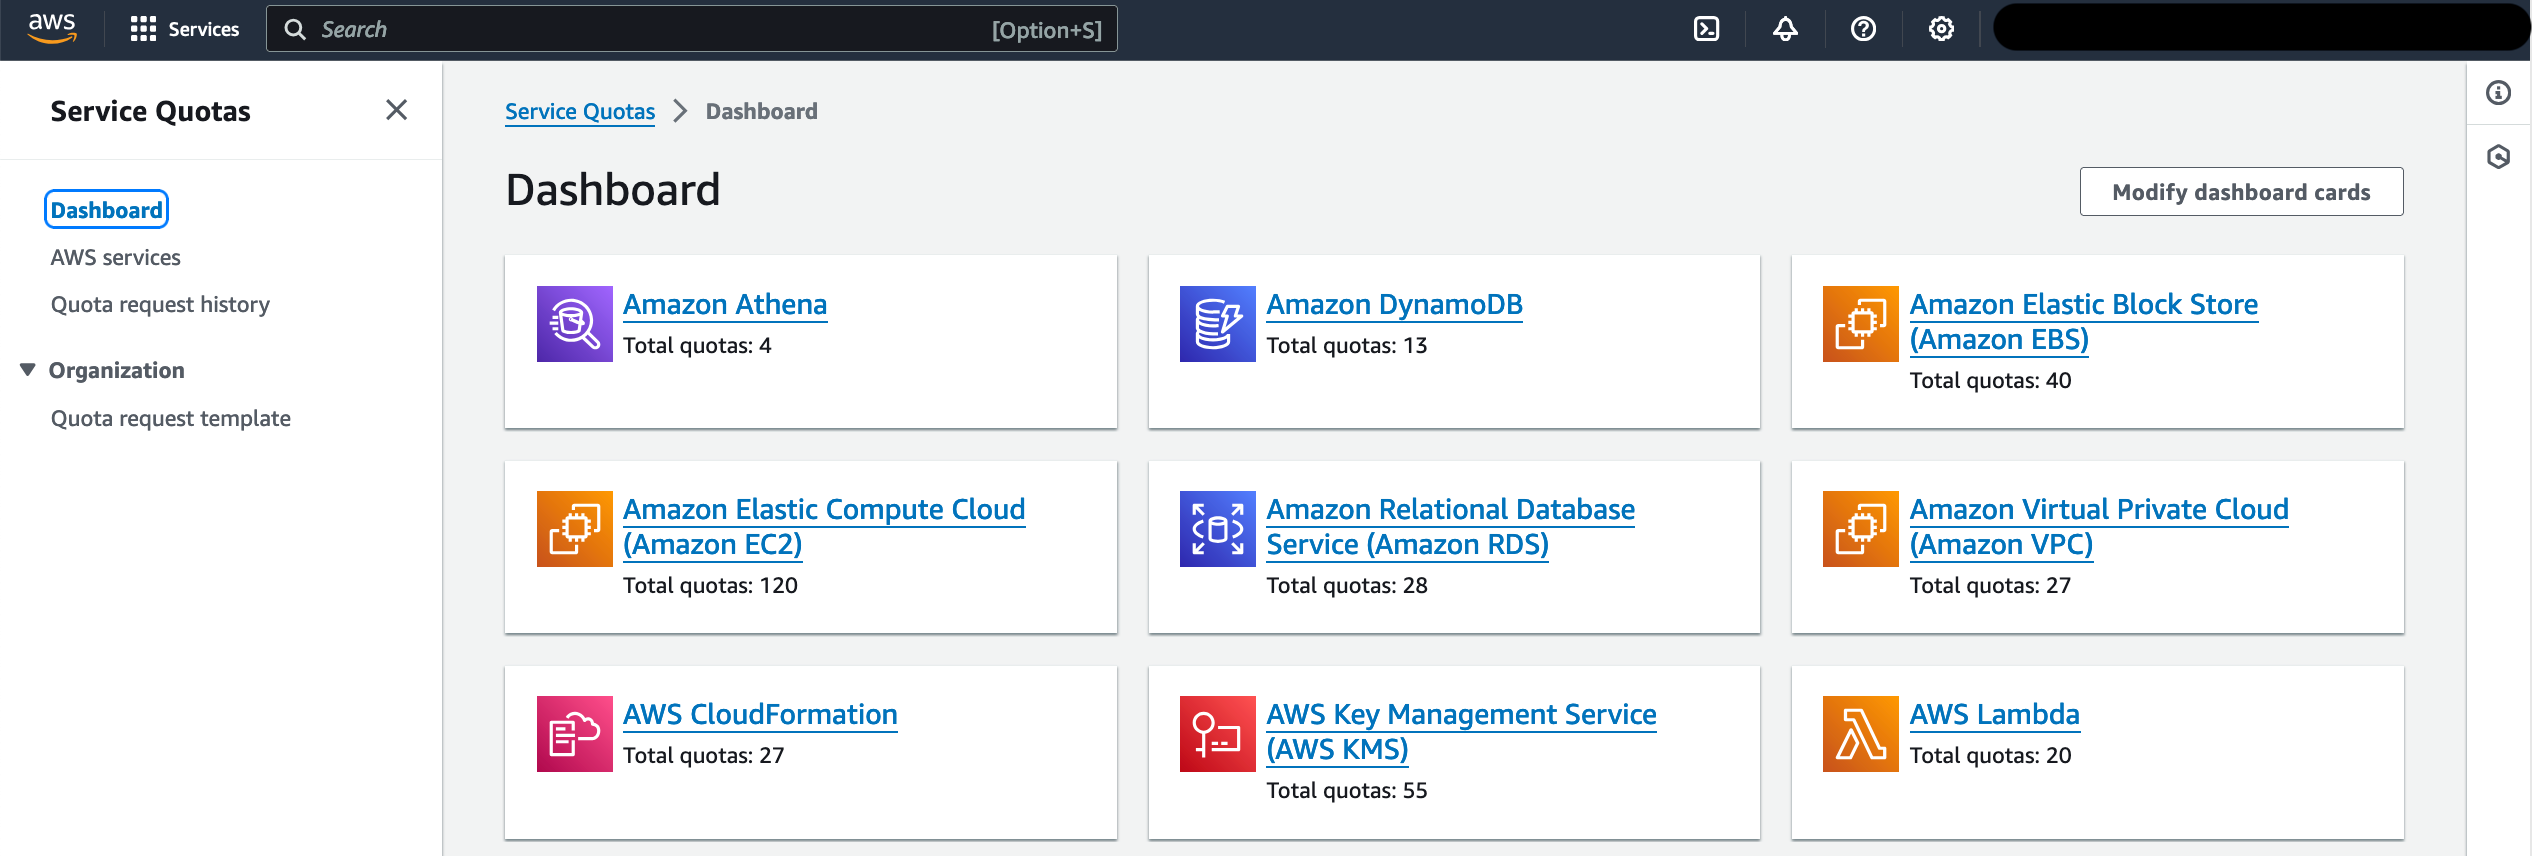
Service limits
These are accessed via the Services Tab of the Management Console. These are quotas applied to various AWS services:
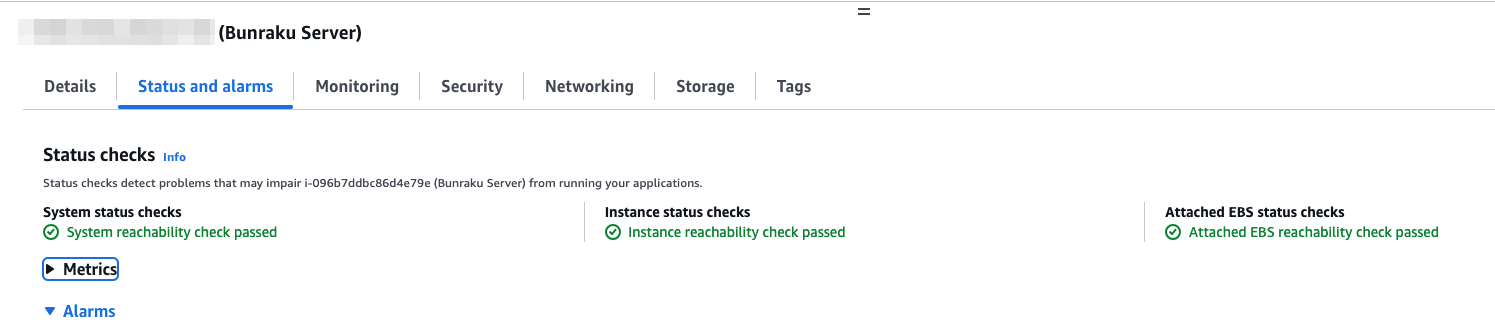
Checking the health status of EC2 instances
The health status of an EC2 instance is displayed when selecting the instance and looking in the Status and alarms tab:
More detailed EC2 health checks are available with AWS Auto Scaling. Configuration options can be found here
Backup and Recovery
Backups
There are various ways to backup the the EC2 instances. Some examples would be to use services provided by AWS
Or you could use the installed CLI tool foreman_maintain to create data backups and snapshots, these could be archived and stored else where. The documentation for foreman_maintain can be found here
Recovery
Depending on how you are backing up your instance and if you are using source control to track puppet module changes, types of recovery can vary from a full EC2 restore or backing out a module change via your favoured source control method.
Appendices
Appendix 1: Table of resources created following a successful deployment
|
Type of Resource |
Name |
Purpose |
|---|---|---|
|
EC2 Instance |
Bunraku server |
Provides Foreman |
Appendix 2: Regions supported
Currently Bunraku is available in UK/Europe, North America and Australia. Please note that support tickets logged from North America and Australia will receive an initial response within one (UK) business day.
Appendix 3: Bunraku architecture
.png?cb=20cf4ad3dcdf9f1d5202d8c4107bab84)
FAQ
-
How do I login to begin setup of my Foreman server?
The connect tab of the EC2 instance below details how to connect to begin initial setup.
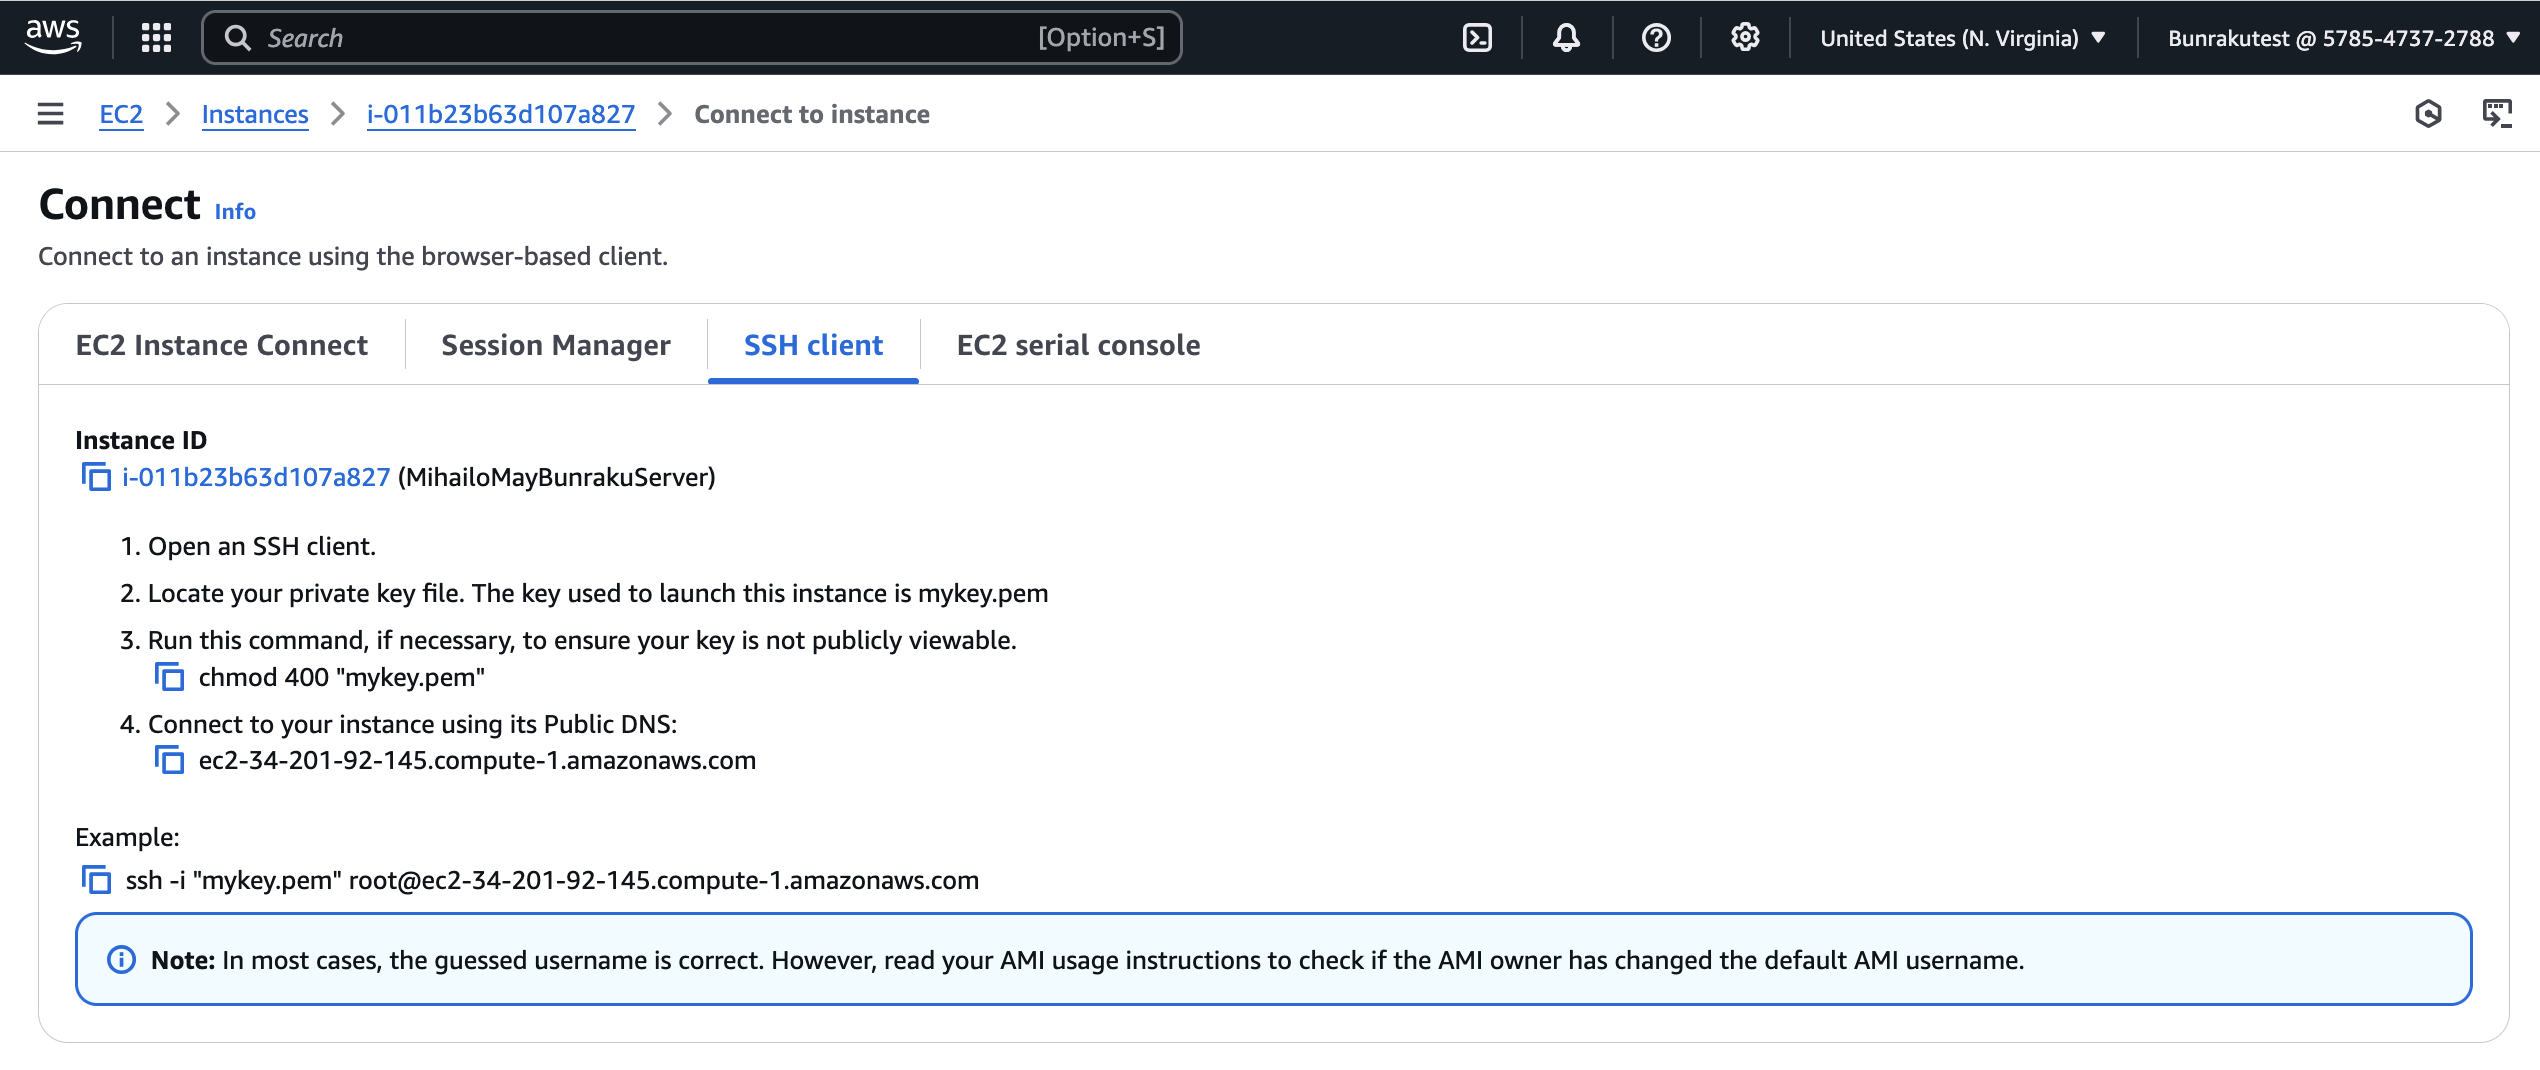
Note that the default username for the purposes of initial setup is ‘ubuntu’.
-
Why am I getting permissions errors when I try to login to begin set up of my Foreman server?
Ensure that the ssh key you are using has the right permissions. If not run chmod 400 “mykey.pem”.